
Deck Leaks
by David H. Pascoe, Marine surveyor
Wet beds, mildew, rust stains in the cabinets, water stained and rotting paneling, stained headliners, rotted deck cores with soft spots . . . these are just a few of the damages caused by deck leaks.
Whether we're talking sail or power boats, deck leaks tend to be a pervasive problem, one which few people give much thought to until it's too late and the damage has been done. And as the boat building industry keeps on turning out boats of ever decreasing quality, the problem continues to worsen. Sometimes the leaks can be repaired, other times not.
Contents
- Introduction
- Pre Existing Holes
- Railing Stanchions
- Repairing Leaking Stanchions
- Hatches
- Deteriorated Deck Cores
- Window Frame Leaks
- Leaking Port Holes
- Chain Plates with 3 illustrations
Let's begin with the fact that nearly all boat decks are cored with materials like balsa, plywood and foam. The coring is necessary for several reasons, including strength. But the cores are also good heat insulators too, and there's nothing wrong with the basic concept of coring a deck except when water gets into it. Leaking decks usually have two basic causes:
1. Improper design, construction and installation of hardware.
2. Installation or removal of hardware and other equipment by the owner.
The first thing we need to understand about decks is that the cores must be designed to be completely water proof, followed by the rule that nothing must ever be done to the deck to damage that water proofing. Of course, people find it necessary to attach things to their decks, and that's where the second basic problem arises. They drill holes in the deck and screw things down without realizing that what they are doing is creating a point of water entry into the core.
"Oh, but I caulked the hardware when I fastened it down," people tell me. Unfortunately, they don't understand several important points. First, screws are a lousy way to attach things to fiberglass which is brittle and will not hold screws very well. Secondly, as the screws loosen, even just a little bit, the caulking also loosens and the leaks begin. So what they thought was a good job of attaching something was actually doomed right from the start.
If you own a used boat, you may find yourself the victim of the former owner's ignorance. If you bought your boat new, pay heed to what you should and should not do as respects adding hardware.
Those folks who build top quality boats make it a rule that nothing should ever be attached (1) with screws, and (2) to a cored structure. When you look at a well designed boat, what you will find is that at every point of attachment (a) there is no core in at that point, and (b) the hardware is bolted through the deck. This should be the inviolable rule for both boat builders and boat owners. Never, ever, attach anything to a cored structure. Illustrated below is the proper design and installation method of hardware to cored structures. Notice that the deck has to be designed properly in the first place.
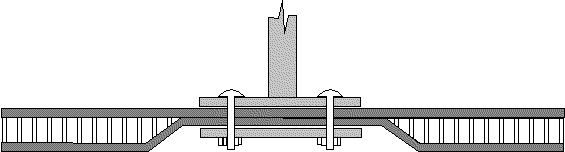
Click for bigger illustration.
If the builder just ran screws through a cored deck, you've got a problem.
Pre Existing Holes
I would venture to guess that about 75% of all boats that I survey have holes drilled in the decks, holes that are revealed by the removal of hardware, and holes that were never even properly repaired. Whether there are existing holes in the deck, or you plan to remove a piece of hardware, the first thing you must be aware of is that you just can't fill the hole with putty and forget it. Fiberglass expands and contracts with heat and cold, so that just filling the hole with putty won't seal it. The putty will loosen and the leaking will begin.
If you have existing holes, or holes with open seams around the filler, they need to be repaired immediately. But before you can do that, you need to determine if there is water in the core. It won't do you any good to try to fill a hole that is wet. You might as well paint your boat while it's raining for all the good that will do. To determine if it's wet, drill a 3/8" hole on the underside: if the core shavings come out wet, you got a problem. Now, I know some of you are going to be thinking, "Sheesh, I gotta go through all that rigmarole just for a coupla lousy screw holes?" Well, let me tell you what's likely to happen when you don't. A few years down the road when it's being surveyed for the new buyer, the surveyor says, "Well, gee, look here, there are holes in the deck and the core is all rotted and that's going to cost $2500 to fix." And guess who's pocket that comes out of. Right, yours!
So now that you know that dinky li'l hole in the deck is serious business, here's what's got to be done to fix it. What you do is to drill a total of four more holes on the under side in a rectangular pattern, bracketing the area. You can just take a small drill and run it straight through the deck from the hole(s) that you're going to fill to locate the area from the underside. Temporarily cover the holes on deck with silicone sealer, and then wait at least two weeks for the core to dry out. Once the core is dry, then take a drill that is just slightly larger than the old holes and drill them out to get a nice clean surface to which your epoxy paste can adhere to. Using a nail or something similar, work the epoxy paste down into the hole until the hole won't hold any more. On the surface, pile the epoxy up a little to make a slight hump that you'll come back with a razor blade and slice off nice and smooth after it has cured. It's not likely that you're going to go to all the hassle of gel coating the finish, so you can just touch up with a dab of white enamel. It won't look so good, but at least you won't end up with a rotted deck core.
Railing Stanchions
The most common point of leakage is from stanchion bases. For some strange reason, the boating industry has never seen fit to manufacture stanchion bases that are wide enough to resist the tremendous amount of leverage that is placed on the base by a 36" stainless steel pipe. When you lean against a stanchion, you are likely to be placing at least several hundred foot-pounds of pressure at the base. With that in mind, it's not hard to understand why they so often come loose and start leaking. And to make matters worse, you'll often find that on small boats, the rails are simply screwed and not bolted on. And if that's the case, there's not a darn thing you can do about it because it's just plain built wrong.
The above illustration shows the proper method of installing a stanchion or any kind of hardware. Notice that there is no core in way of the point of attachment, an area of solid fiberglass called a 'boss." This eliminates any possibility of water getting into the core, and provides a very strong point for mounting. Obviously, if your boat is not built this way, there's nothing that can be done to change the original design.
Repairing Leaking Stanchions
Leaking stanchions can be repaired if you have some access from the underside. Unfortunately, in most cases you have to tear the interior of the boat apart to get that access, which accounts for the reason why deck leaks are rarely ever repaired. The leaks just go on and on until the interior is ruined and the boat gets junked, or some poor fool comes along thinking he can restore it.
If you cannot reach the stanchion bolts from the underside, it's a waste of time to try to caulk it from the exterior. No amount of exterior caulking is going to stop the water. There is only one way to effectively stop the leaks, and that is to rebolt the stanchion bases, and to add aluminum doubler plates to the underside if it doesn't already have them. It's the lack of doubler plates that is probably part of the problem in the first place, and unless you resolve this, nothing short of strengthening the mounting will help.
There should be no deck coring in way of the stanchion bases but, if there is, what you have is a badly designed boat. If the core is deteriorated around those bases, then what you are looking at is a repair job of major proportions, and one that almost no one will foot the bill for. If there is no core in way of the bases, then all that is necessary is to remove the headliner or whatever is covering up the fasteners on the inside and remount everything. The thing is, if they were bolted on in the first place, they are not likely to be loose, meaning that what you've got is probably screwed on stanchions. The only way to remedy this is to bolt them on. That's easy to say and very hard to do.
The second most common offender is improperly installed hatches which, just like improperly installed stanchions, are extremely difficult to correct. Most often the causes are as follows:
(1) There is not enough framing in the deck so that the deck sags somewhat, making it impossible for any caulking under the hatch frame to seal. In this case, you can remove the hatch frame, recaulk it, only to have it start leaking again. The only solution for this is to drop the headliner (if possible) and add frames around the hatch opening to strengthen it against deck deflection.
(2) While the deck may be strong enough, the hatch opening may be improperly designed. If all the builder did was to cut a hole in the cored deck (as many do) and simply screw the hatch frame in place, then that is the source of your problem. Whatever small about of deflection there is in that deck is going to break the screws and caulking loose. Check the screws: if they're loose and won't tighten up, then that's the problem.
Remove the frame and check if the hatch is screwed into the core. Chances are it is, and if that's the case then it can be fixed fairly easily. Here's the method I used for repairing a foredeck which had no frames whatever, and a hatch that was installed through the core.
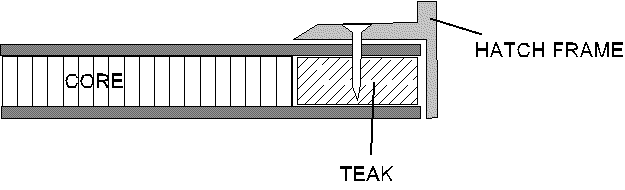
Click for bigger illustration.
My deck was very weak, so what I did was to cut two fir frames and heavily glassed them to the underside of the deck, one forward and one immediately aft of the hatch. Since the headliner was glued to the underside, I opted to replace it with new white vinyl and contact cement. Took 3 hours with 2 people.
The basic idea here is to remove the core (balsa or foam) and replace it with a wood frame as show in the above illustration. In my case it was balsa and I cut it all out 2-1/2" around the perimeter of the hatch, mainly by just digging it out from between the glass laminates. Then I smoothed off the rough inside laminate surfaces with a sanding disc. Next, cut a teak framework to fit the perimeter of the hatch, making the frames about 1/16" less than the distance between the void space that you have created by digging out the core. If the deck is slightly curved, you need to shape the teak strips accordingly by planing them to the proper contour. This is likely to be only a few degrees of arc and won't be difficult, but if you fail to do this, it will distort the deck!
Next, fit the pieces between the laminates, set the hatch frame in place and drill new bolt holes to size of the new bolts (instead of screws) that you're going to use. If the headliner is glue to the deck underside, you should bolt right through the liner, or be prepared to install moldings to cover up the bolts. After all the new holes are drilled, you next load the void up with epoxy, fit the teak frames into the void, caulk the underside of the frame, and then bolt the whole mess together while its still wet. Make sure that the edges around the new framework are completely sealed off with the epoxy, as well as the surface of the exposed teak.
Before putting it all together, perform a dry fit to make sure that when you bolt the frame down that it does not distort the frame when the bolts are tightened. It should merely squeeze it altogether, not cause any distortions in the deck. If you did the job right, I guarantee you this hatch will never leak again. This part of the job took about 8 hours.
Deteriorated Deck Cores
Sometimes these are repairable, sometimes not depending on where the problem is and what has to be cut out to make the repairs. If you have, or suspect you have, water in a deck core, the way to tell is to simply drill a couple of small holes in the underside and see if water runs out.
The best way to repair deck cores is from the underside when that is possible. Making repairs is easy, but putting back together everything that has had to be torn out is where the real work comes in. The problem with repairing from the exterior is that it is extremely difficult to accomplish a finish repair that doesn't look like its been repaired, and it's not a job for an amateur. If you can't make the repair from the underside, you should not try an exterior repair yourself unless you are highly skilled in this sort of thing. Few people are. If you can't get access from the underside, then you have a major and costly problem on your hands.
Window Frame Leaks
A pervasive problem, window frame leaks almost invariably occur because the structure in which the frame is mounted is weak. That usually means either the deck below or the house top above it is distorting and causing the caulking seal to break open. Whether or not it can be repaired needs to be evaluated by an expert, as you don't want to waste a lot of effort and money at resetting the frames only have them start leaking again.
One possible method of repair is to remove the frames and to reset them using bolts instead of screws. Problem is, you're not likely to be able to get at the inside without ripping things apart, so now what? Here's a possible solution that will require several days to accomplish. Remove all the window frames, and remove all the old caulking completely. Use acetone to get it all off. Then sand the mounting surface with 80 grit paper to rough it up. What you will do next is to apply a very heavy layer of caulking and then reset the frame. Only instead of completely pulling the fasteners tight, you will put 1/16" to 1/8" thick shims under the frame and only draw the frame against these shims. This will leave a layer of caulking that will form a gasket. After you've done this, you wait 2 days for the caulking to cure. Then you pull the shims out and draw the fasteners tight.
What you will have accomplished here is to provide a greater degree of flexibility to the joint surface that will permit some movement of the supporting structure without breaking it completely loose of the seal. As long as the fasteners are holding, you can continue to draw it tight if the leaking continues. This method will work for good quality frames and for a structure that is not hopelessly weak. It will only work for frames that have flat, and not concave inside surfaces.
Leaking Port Holes
Ports in hull side usually leak because the hull side is weak and panting. This causes the caulking seal to break loose and the frames to crack or distort, particularly if they are plastic. Kick the hull side with your foot. If it flutters, then you know what the problem is. You can pull it apart and recaulk, but it will probably soon start leaking again.
Sometimes builders install the port frames with a vinyl or fabric liner under the inside frame that causes water to wick through. Others installed plastic frames in curved surfaces so that, when the fasteners are drawn tight, the frame distorts and the gasket will not make a complete seal. This can sometimes be corrected by releasing the flange or base plate. If it springs back to a level surface, you can recaulk with 5200, but this time do not draw the fasteners completely tight where the gaps appear on the curved surface. Just draw it tight enough to bring the flange into the caulking so that there is a seal. This may allow the thicker layer of caulking to flex without breaking the seal. Then again, it may not.
Even on well built boats, as they age time will break the caulking seals around ports. For hull sides that are fairly solid, you can use the same method as for window frames described above.
Chain Plates
Most people find that sealing chain plates that go down through decks to be impossible. Between the flexing decks and the stress on the plates, it really is. Silicone and other types of caulking won't work because it won't stick to stainless steel and its impossible to get a water tight seal. To make matters worse, if the chain plate is bolted to a plywood bulkhead, the leaking is going to cause the plywood to rot and eventually the rig will topple over. The answer to this problem is to design a method that limits the amount of water that can enter.
First of all, remember that when it rains, water is going to run down the rigging. You don't notice this, but it does, and that's one of the reasons so much water gets in through those tiny cracks. The other is that the stainless bar penetrates the deck in a place where water is standing.
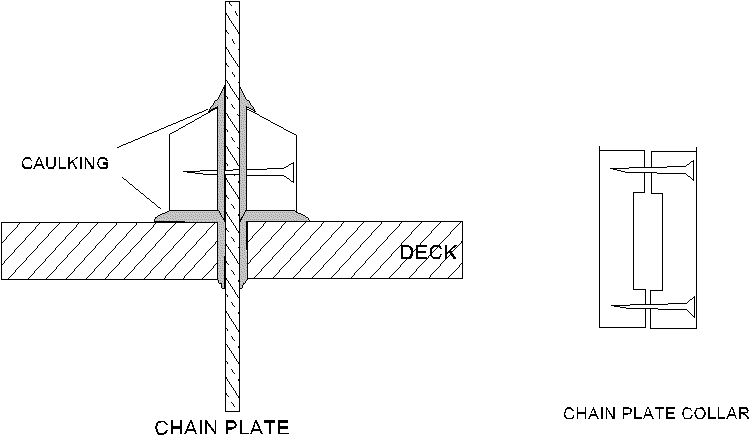
Click for bigger illustration.
The above illustration shows a collar arrangement that is effective in stopping most of the leakage. The collar is made of acrylic plastic, cut on a band or hand saw to fit around the chain plate. It is clamped together with a screw fore and aft and serves two purposes. The caulking gap between plastic block and chainplate should be close to 1/4" to allow for movement.
What this accomplishes is that, first, it creates a cofferdam at deck level so that standing water won't leak in around deck level. Secondly, since we can't get an adhesive bond to the metal, we've going to use a pressure bond instead by tightening the screws against the 5200 caulking AFTER it cures. The contact surfaces of the plastic should be rough cut to help with adhesion. The plastic is then glued to the deck with 5200, and caulked around the chain plate. Rough up the gelcoat surface on the deck with sandpaper or a Dremmel tool and bit. You should shoot for a layer of caulking between the collar and the deck of nearly 1/4" thick to allow for as much flexibility in the caulking as possible. Then, after the caulking is cured, we come back and tighten the screws slightly . . . . but no so much as to pull the plastic collar loose from the deck.
The nice thing about this arrangement is that if you don't get a good seal the first time, you can always pull it up and start over, or redo it if it starts leaking again later. Notice here that the whole idea is to allow for some flexibility without seams opening up.
Posted October 11, 1998 (First posted July 9, 1998 at www.yachtsurvey.com. Page design changed for this site.)

Over 180
Online Articles by David Pascoe

Power Boat Books
 Mid Size Power Boats
 A Guide for Discriminating Buyers
Focuses exclusively cruiser class generally 30-55 feet
With discussions on the pros and cons of each type: Expresses, trawlers, motor yachts, multi purpose types, sportfishermen and sedan cruisers.

Selecting and Evaluating New and Used Boats
Dedicated for offshore outboard boats
A hard and realistic look at the marine market place and delves into issues of boat quality and durability that most other marine writers are unwilling to touch.

2nd Edition
The Art of Pre-Purchase Survey The very first of its kind, this book provides the essentials that every novice needs to know, as well as a wealth of esoteric details.

Pleasure crafts investigations to court testimony The first and only book of its kind on the subject of investigating pleasure craft casualties and other issues.