
All About Bilge Pumps
Those Essential Devices for Keeping Your Boat Off the Bottom
by David H. Pascoe, Marine surveyor
| Page 1 | Page 2 | Page 3 | Page 4 |
Pump Installation
Considering the need for redundancy, there are two ways to install back up pumps. You can install both at the same level in the bilge and locate the float switch for the reserve pump up higher, say 6 - 10" so that it will be activated when the primary pump fails or can't keep up. The alternative, which I prefer, is to mount the switch and back up pump itself up higher (Illustration below). The reason for this is the tendency of debris in the bilge to foul the impeller over time; mounting it higher up precludes this. In either case, the installation should be arranged so that the back up pump takes over at a predetermined water height. Preferably this should be at a level before water rises above the cabin sole (or any equipment in the bilge like batteries) and causes damage.
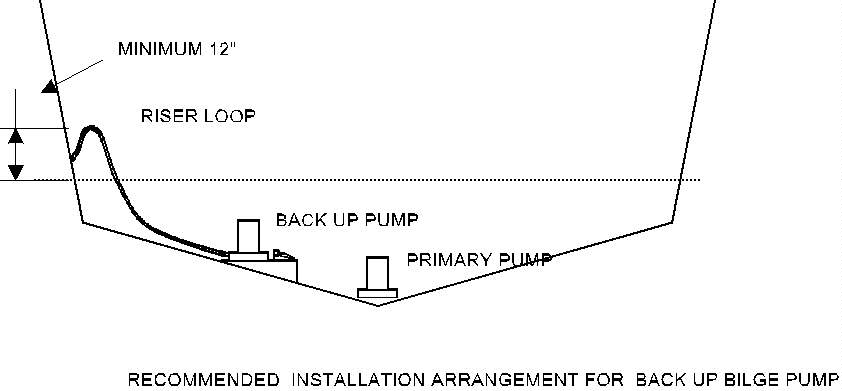
Click for bigger illustration
Float Switches
Those wonderful little buggers. Doncha love 'em? Yes they suffer a high rate of failure and you're always wondering why someone can't invent a better one. Well, devising a better switch would be easy. Problem is, you wouldn't pay the cost of the thing, so we have to suffer with what we got. Actually, most switches fail not because of lousy switch design, but because of thoughtless installation or lack of maintenance. These are not self-cleaning devices. There are four things you need to consider for reliable switch installation: (1) no debris in bilge, (2) nothing should interfere with the rise and fall of the switch, (3) it must be wired properly, and (4) it must be protected from the surge of water in the bilge.
Open Versus Covered Switches
The enclosed float switch would seem like the ideal solution to switch fouling problems except for one thing: you can't see or test the switch. Further, the enclosed switch is just as likely to become clogged with sludge and things like hair in the bilge as the open switch. Only now you can't even see it. The only problem they really solve is water surge damage. The open switch is the better choice as long as you clean it once in a while, and locate it so that it's protected from water surge.
| Note: Sludge is formed when oil in bilge water adheres to surfaces and then collects dirt. Eventually it becomes a tar-like substance that will prevent the float switch from moving. |
The switch can easily be protected from surge by simply locating it within 3" of a bulkhead with the flapper facing AFT. Always AFT. See my point? If surging water catches the flapper from the front, it tears the flapper off its hinges. Okay, now that problem is solved. The next one is that you have to keep your bilge clean. Nothing, but nothing is going to survive a bilge with sludge and debris in it. Finally, all your wires and hoses have to be secured to that they don't move and end up sitting on top of the switch. Don't forget boats bounce around a lot; those things have to be well secured.
It would be my guess that well over 50% of all pump failures are caused by water getting at wire connections and causing corrosion and high resistance. People just don't realize that corroded connections cause a power loss that can either cause the pump to burn up, or the wire connections to overheat and terminate all power flow. That's why it's imperative that the wire connections be made as high above the bilge as possible, and that they be protected against getting wet from any other source, like water dripping from above.
Doing It the Right Way
I recommend that the connections be made using a covered, plastic junction box, the one hole type (Such as the Carlon boxes you can get for a few bucks at Home Depot), mounted on the nearest available vertical surface. Obtain a small terminal block, preferably with brass terminals. If you can't find small ones, cut a larger one in half; they're made to be cut. Attach ring terminals on the wires, wire it to the terminal block, and put the terminal block inside the junction box and install the cover. You can leave the terminal block loose inside the box so you can pull it out to check or repair connections. Be sure to mount the box with the wire hole at the BOTTOM, not the top! This is a particularly good way to install pumps in open boats and under cockpits where leaking and condensation sweating is a constant problem. Forget about butt connectors, electrical tape and silicone and heat shrink; none of these solves the water problem.
The Discharge Outlet
It's amazing that after all these years, so many boat builders still do not know how to properly install the discharge plumbing. You'd think any fool would realize that you can't just pump it out through a hole in the hull a couple inches above the water line without the water flowing back in. But they don't.
The discharge outlet is usually placed near the water line because the splash from the discharge goes up on the hull side and makes a mess. So the motivation here is no space. Fine, but you have to do something to prevent water from coming back in. That something is called a riser loop. The riser loop extends the discharge hose well above the water line to prevent this. Of course, if for any reason that discharge should go below the water line, you are right back to the reverse siphoning problem again. Unfortunately, there's no good way to deal with this short of raising the discharge higher up. Siphon breaks and check valves are notoriously unreliable because of their tendency to get clogged.
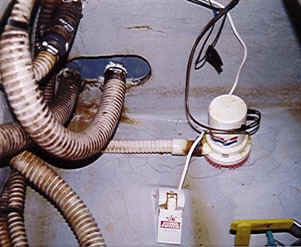
How not to install a bilge pump. You can see by the high water line that it has already failed. The hoses at left were restraining the float switch and the wire connections were laying in the bilge water. They were moved prior to taking this photo. The builder installed it this way.
For power boats, I recommend a riser loop height of about 18" above the water line. For sailboats, you have to consider the heel angle of the hull, which means that it will probably be tapped into the cockpit scuppers or sink drain. Here you have to be real careful of judging the water line right. Sink drains often aren't high enough to tap into it safely, so be sure to check the water level carefully. It's also not a very sanitary thing to do.
Teeing into existing lines is okay as long as you understand what you're doing. The T must always induce water into an overboard on the vertical, never the horizontal plane. This is to obviate any possible backflow. It's best to use a 30 degree angle fitting; a 90 degree T causes turbulence and reduces water flow greatly.
When adding new pumps, you can avoid making new holes in the hull by increasing the diameter of your existing outlet -- say from 3/4' to 1-1/4" and adding a manifold. No, you can't double up on a 3/4" outlet because it's too small and will not handle the increased flow and will restrict the pumps. Just buy a larger fitting and increase the existing hole size. If you find it easier to drill another one, by all means do that. Nor should you ever double up on a plastic t-hull because it will break; if you have plastic, you MUST replace it with bronze. If you do add a manifold, make sure that the lever arm it creates is supported, whether it's horizontal or vertical. Also make sure that the hoses are well supported so they don't kink. Continued to page four
| Page 1 | Page 2 | Page 3 | Page 4 |
Contents
-
Page 1
- Introduction
- What Makes for an Adequate System?
-
Page 2
- Evaluate the Number of Compartments
- Determining the Number of Pumps
- Outboards and Stern Drives
- Capacity of Pumps
- What Brand?
-
Page 3
- Pump Installation
- Float Switches
- Open Versus Covered Switches
- Doing It the Right Way
- The Discharge Outlet
-
Page 4
- Emergency Pumps - Who Should Have Them and Why
- Battery Power
- Wiring Pumps
Posted November 10, 1998 (First posted 6/10/98 at www.yachtsurvey.com. Page design changed for this site.)

Over 180
Online Articles by David Pascoe

Power Boat Books
 Mid Size Power Boats
 A Guide for Discriminating Buyers
Focuses exclusively cruiser class generally 30-55 feet
With discussions on the pros and cons of each type: Expresses, trawlers, motor yachts, multi purpose types, sportfishermen and sedan cruisers.

Selecting and Evaluating New and Used Boats
Dedicated for offshore outboard boats
A hard and realistic look at the marine market place and delves into issues of boat quality and durability that most other marine writers are unwilling to touch.

2nd Edition
The Art of Pre-Purchase Survey The very first of its kind, this book provides the essentials that every novice needs to know, as well as a wealth of esoteric details.

Pleasure crafts investigations to court testimony The first and only book of its kind on the subject of investigating pleasure craft casualties and other issues.